Expo SDK 56 中的原生代码:内联模块与类型生成
把 Swift 和 Kotlin 模块直接写在应用文件旁边,SDK 56 会自动生成对应的 TypeScript 接口。
中文
复制
把原生代码集成到 React Native 应用里需要费一番功夫。Expo modules 能帮你省掉一部分,但用起来有两个主要的卡点:
-
包的样板代码:你得先创建模块,而模块本身是一个独立的包,只有把它搭好之后才能开始写原生代码。
-
多套接口:你得手动维护一份 TypeScript 模块接口,让它和原生那边(Swift 和 Kotlin)保持一致。
在 SDK 56 里,我们决定动手解决这两个痛点,于是发布了 inline-modules 和 expo-type-information 包。有了这些改动,写新模块变得更快也更省事。
用 inline modules 配合类型生成
inline modules 的核心思路就是把开销压到最低。现在你可以直接在项目结构里写 Swift 和 Kotlin 模块,就放在其他应用文件旁边。需要一个自定义原生视图?在 App.tsx 旁边建好 NativeView.kt 和 NativeView.swift 文件,把视图写进去就行。
inline modules 的配置
inline modules 的配置极其简单:在应用配置文件里设置 watchedDirectories,也就是项目里存放 inline modules 的目录列表。运行 npx expo prebuild 同步原生项目之后,就可以开始用了。
{
  "expo": {
    "experiments": {
      "inlineModules": {
        "watchedDirectories": ["app"]
      }
    }
  }
}
把 "app" 加到 watchedDirectories 之后,你就可以在 app 目录及其子目录(比如 app/nested/ 或 app/nested/directory/)里的任意位置创建 Swift 和 Kotlin 文件。比如现在可以打开 app/nested/InlineModule.swift,把 Expo module 写进去。
internal import ExpoModulesCore

class InlineModule: Module {
  public func definition() -> ModuleDefinition {
    Constant("Hello") {
      return "Hello iOS inline modules!"
    }
  }
}
写完之后,在 JavaScript 里用 requireNativeModule('InlineModule') 就能访问它。如果你在这个模块里创建了视图,也可以用 requireNativeView('InlineModule') 导入。
加入类型生成
inline modules 消掉了创建 Expo module 所需的大部分样板代码,而类型生成则让调用模块变得更简单。原生模块写好后,你还需要一份 TypeScript 接口,用起来才顺手(能启用类型检查和自动补全)。这部分由 expo-type-information 包负责,它会解析 Swift 模块,并自动生成对应的 TypeScript 类型。
该软件包附带一个功能强大的 CLI 工具。
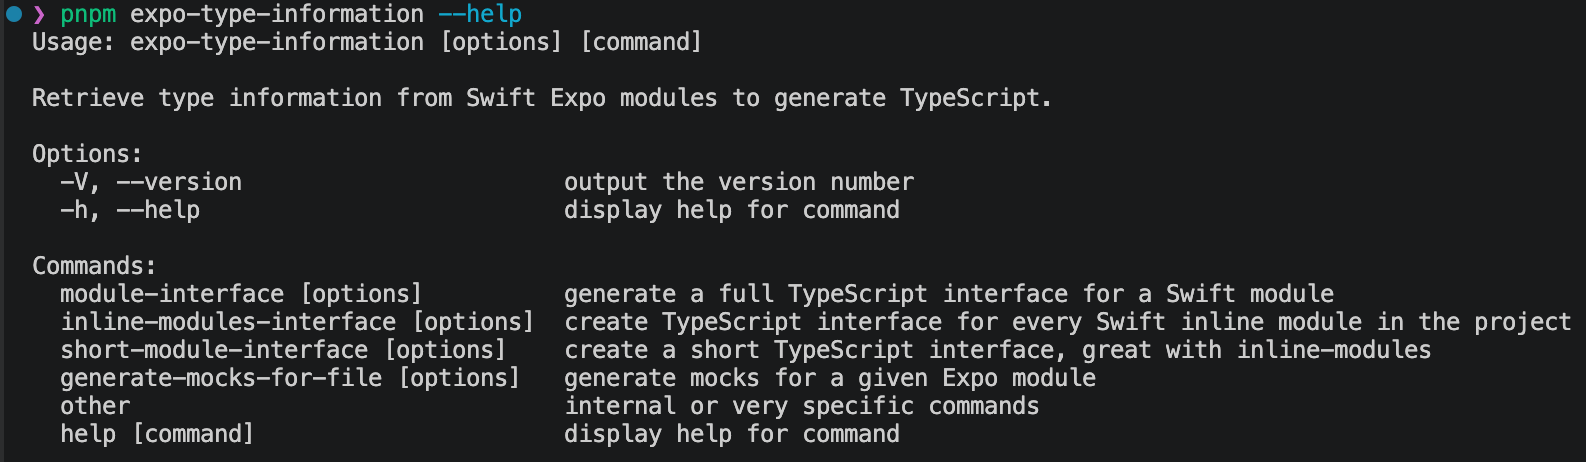
CLI 中有一条专门针对 inline module 的命令:inline-modules-interface。它会找出项目中所有的 Swift inline module,并为每一个生成两个 TypeScript 文件。
运行该命令后,你会看到生成的这一对文件出现在 Swift 文件旁边:InlineModule.generated.ts 和 InlineModule.tsx:
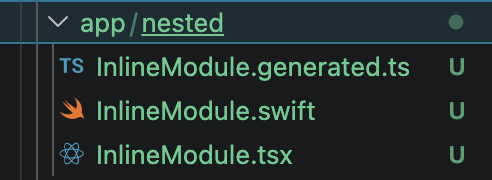
- 生成文件([ModuleName].generated.ts):包含模块的全部类型信息,涵盖模块 DSL 声明(函数、常量、类、视图等)以及可转换的 Swift 构造(枚举和 record struct)。每次运行命令,该文件都会被覆盖。
/*Automatically generated by expo-type-information.*/

import { ViewProps } from 'react-native';

import { NativeModule } from 'expo';

export declare class InlineModuleNativeModuleType extends NativeModule {
  readonly Hello: string;
}
- 稳定文件([ModuleName].tsx):重新导出模块接口,并在存在主视图时为其提供默认导出。该文件可以编辑,一旦修改过就不会再被覆盖。
// File hash: 8dfc86f5416afbe08cc1ee581c850fc9cec446479211d85501d9a5e2d24cc534
import { InlineModuleNativeModuleType } from './InlineModule.generated';

import { requireNativeModule, requireNativeView } from 'expo';

const InlineModule: InlineModuleNativeModuleType =
  requireNativeModule<InlineModuleNativeModuleType>('InlineModule');

export const Hello: string = InlineModule.Hello;
这样拆分 TypeScript 模块接口,既能让你调整生成结果中不完善的地方,又能在更新原生侧时重新生成核心的声明映射。
限制
-
文件命名:内联模块的名字必须与定义它的文件名完全一致。此外,模块名必须全局唯一,因为这个名字就是用来从全局对象中取回模块的标识符。因此,同一个项目里不能同时存在 app/InlineView.swift 和 src/InlineView.swift。
-
语言与平台支持:类型生成目前只支持 Swift 模块,且只能在 macOS 上使用。
无法解析的类型
有时我们无法解析原生模块声明的类型。这主要是因为 SourceKitten 的限制,以及我们选择只解析传入的文件,而不做完整的编译流程。当无法解析某个 Swift 类型时,我们会在 TypeScript 中生成 unknown 类型。
以下是常见的几种情况:
- 嵌套声明(例如 DSL
Class):SourceKitten在解析深层嵌套闭包时有限制,因此很难找到Class内部声明的类型。正因如此,类方法的返回类型无法被正确解析(但参数解析没有问题)。以ExpoBlob模块为例:
import Foundation
import ExpoModulesCore

public class ExpoBlob: Module {
  public func definition() -> ModuleDefinition {
    Name("ExpoBlob")

    Class(Blob.self) {
      Constructor { (blobParts: [EitherOfThree<String, Blob, TypedArray>]?, options: BlobOptions?) in
        let endings = options?.endings ?? .transparent
        let blobPartsProcessed = processBlobParts(blobParts, endings: endings)
        return Blob(blobParts: blobPartsProcessed, options: options ?? BlobOptions())
      }

      Property("size") { (blob: Blob) in
        blob.size
      }

      Property("type") { (blob: Blob) in
        blob.type
      }

      Function("slice") { (blob: Blob, start: Int?, end: Int?, contentType: String?) in
        let blobSize = blob.size
        let safeStart = start ?? 0
        let safeEnd = end ?? blobSize

        let relativeStart = safeStart < 0 ? max(blobSize + safeStart, 0) : min(safeStart, blobSize)
        let relativeEnd = safeEnd < 0 ? max(blobSize + safeEnd, 0) : min(safeEnd, blobSize)

        return blob.slice(start: relativeStart, end: relativeEnd, contentType: contentType ?? "")
      }

      AsyncFunction("text") { (blob: Blob) async -> String in
        await blob.text()
      }

      AsyncFunction("bytes") { (blob: Blob) async -> Data in
        let bytes = await blob.bytes()
        return Data(bytes)
      }
    }
  }
}
/*Automatically generated by expo-type-information.*/

import { ViewProps } from 'react-native';

import { NativeModule } from 'expo';

// These types haven't been defined in provided file(s).
export type Data = unknown;
export type TypedArray = unknown;

export type BlobOptions = {
  type: string;
  endings: EndingType;
};

export enum EndingType {
  transparent = 'transparent',
  native = 'native'
}
export enum BlobPart {
  string = 'string',
  blob = 'blob',
  data = 'data'
}

export declare class Blob {
  slice(
    blob: Blob,
    start: number | undefined,
    end: number | undefined,
    contentType: string | undefined
  ): unknown /*The type couldn't be resolved automatically.*/;
  text(blob: Blob): Promise<string>;
  bytes(blob: Blob): Promise<Data>;
  readonly size: unknown /*The type couldn't be resolved automatically.*/;
  readonly type: unknown /*The type couldn't be resolved automatically.*/;
  constructor(
    blobParts: (string | Blob | TypedArray)[] | undefined,
    options: BlobOptions | undefined
  );
}

export declare class ExpoBlobNativeModuleType extends NativeModule {
  Blob: typeof Blob;
}
注意 ExpoBlob 中,slice、type 和 size 的返回类型都没有被解析出来。
这个问题通常可以通过在 Swift 代码中手动标注闭包的返回类型来解决。
-
导入的声明: 我们使用
SourceKitten的方式只会解析提供的文件,而忽略导入。如果某个外部函数或类型影响了返回值,工具可能无法解析它。 -
返回类型: 如果你省略了
return关键字,又没有自己显式标注闭包,工具就很难推断返回类型。要避免这种情况,请标注 DSL 声明,或者确保插入return关键字。想增强return的类型推断,可以试试 CLI 中的--type-inference PREPROCESS_AND_INFERENCE选项。它默认是关闭的,因为实现在少数情况下会失败,但你随时可以试一下,看看对你的模块是否有帮助。
深入探究
本节我们将深入了解 inline modules 和 expo-type-information 包在底层是如何工作的。
Inline modules
我们来看看使用 inline modules 时会发生什么。假设你在 app/nested/InlineModule.swift 创建了一个模块。首先,你需要在应用配置文件中设置 watchedDirectories 列表。这里我们只用 app 文件夹。
{
  "expo": {
    "experiments": {
      "inlineModules": {
        "watchedDirectories": ["app"]
      }
    }
  }
}
预构建
更新应用配置后,你需要运行 npx expo prebuild 来更新原生项目。这主要做两件事:
- 更新 Xcode 项目,使 app 文件夹成为一个文件系统同步组。这样可以确保该文件夹(及其子文件夹)中的所有文件都会出现在 Xcode 编辑器中,并自动包含在 iOS 构建中。
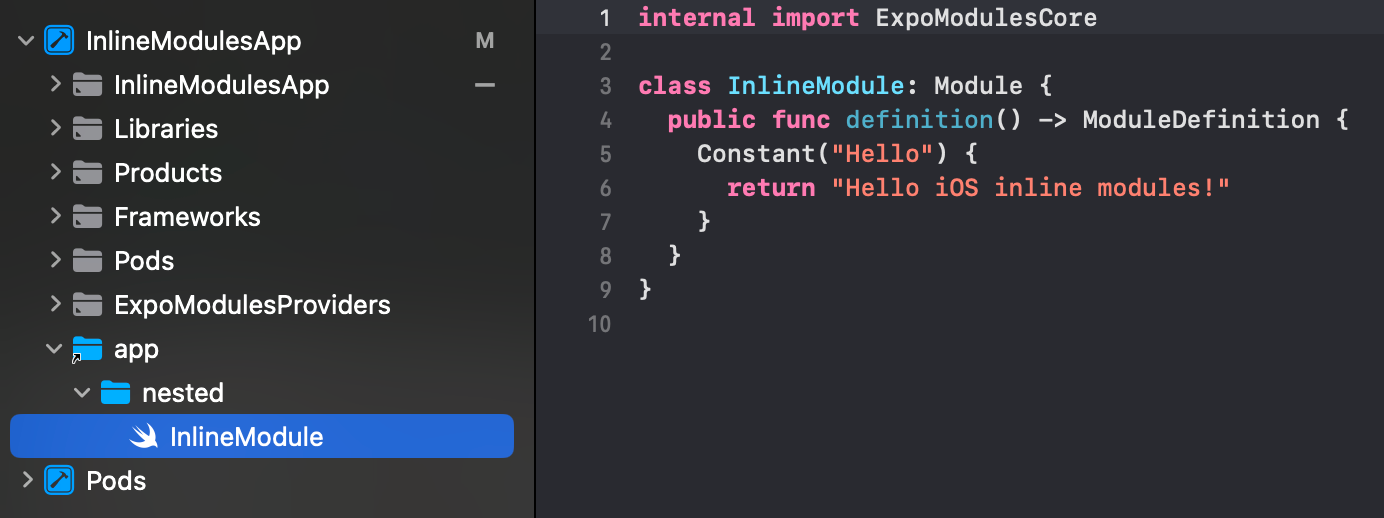
使用 watchedDirectories 更新 iOS 和 Android 两端的项目属性。在 Android 上,这是将文件纳入 Android Studio 的必要步骤。这些属性在后续的 autolinking 阶段也会用到。
{
  "expo.jsEngine": "hermes",
  "EX_DEV_CLIENT_NETWORK_INSPECTOR": "true",
  "expo.inlineModules.watchedDirectories": "[\"app\"]"
}
# ...
expo.inlineModules.watchedDirectories=["app"]
Android 项目
在 Android 侧,项目的更新发生在 Gradle 配置阶段。触发时机有两种:在 Android Studio 中手动点击 Sync Project with Gradle Files 按钮,或在构建应用前自动触发(例如使用 npx expo run:android 时)。
这一阶段会创建一个与你的 watchedDirectories 对应的文件夹结构,并在这些 watchedDirectories 子树中为 Kotlin 文件建立符号链接。
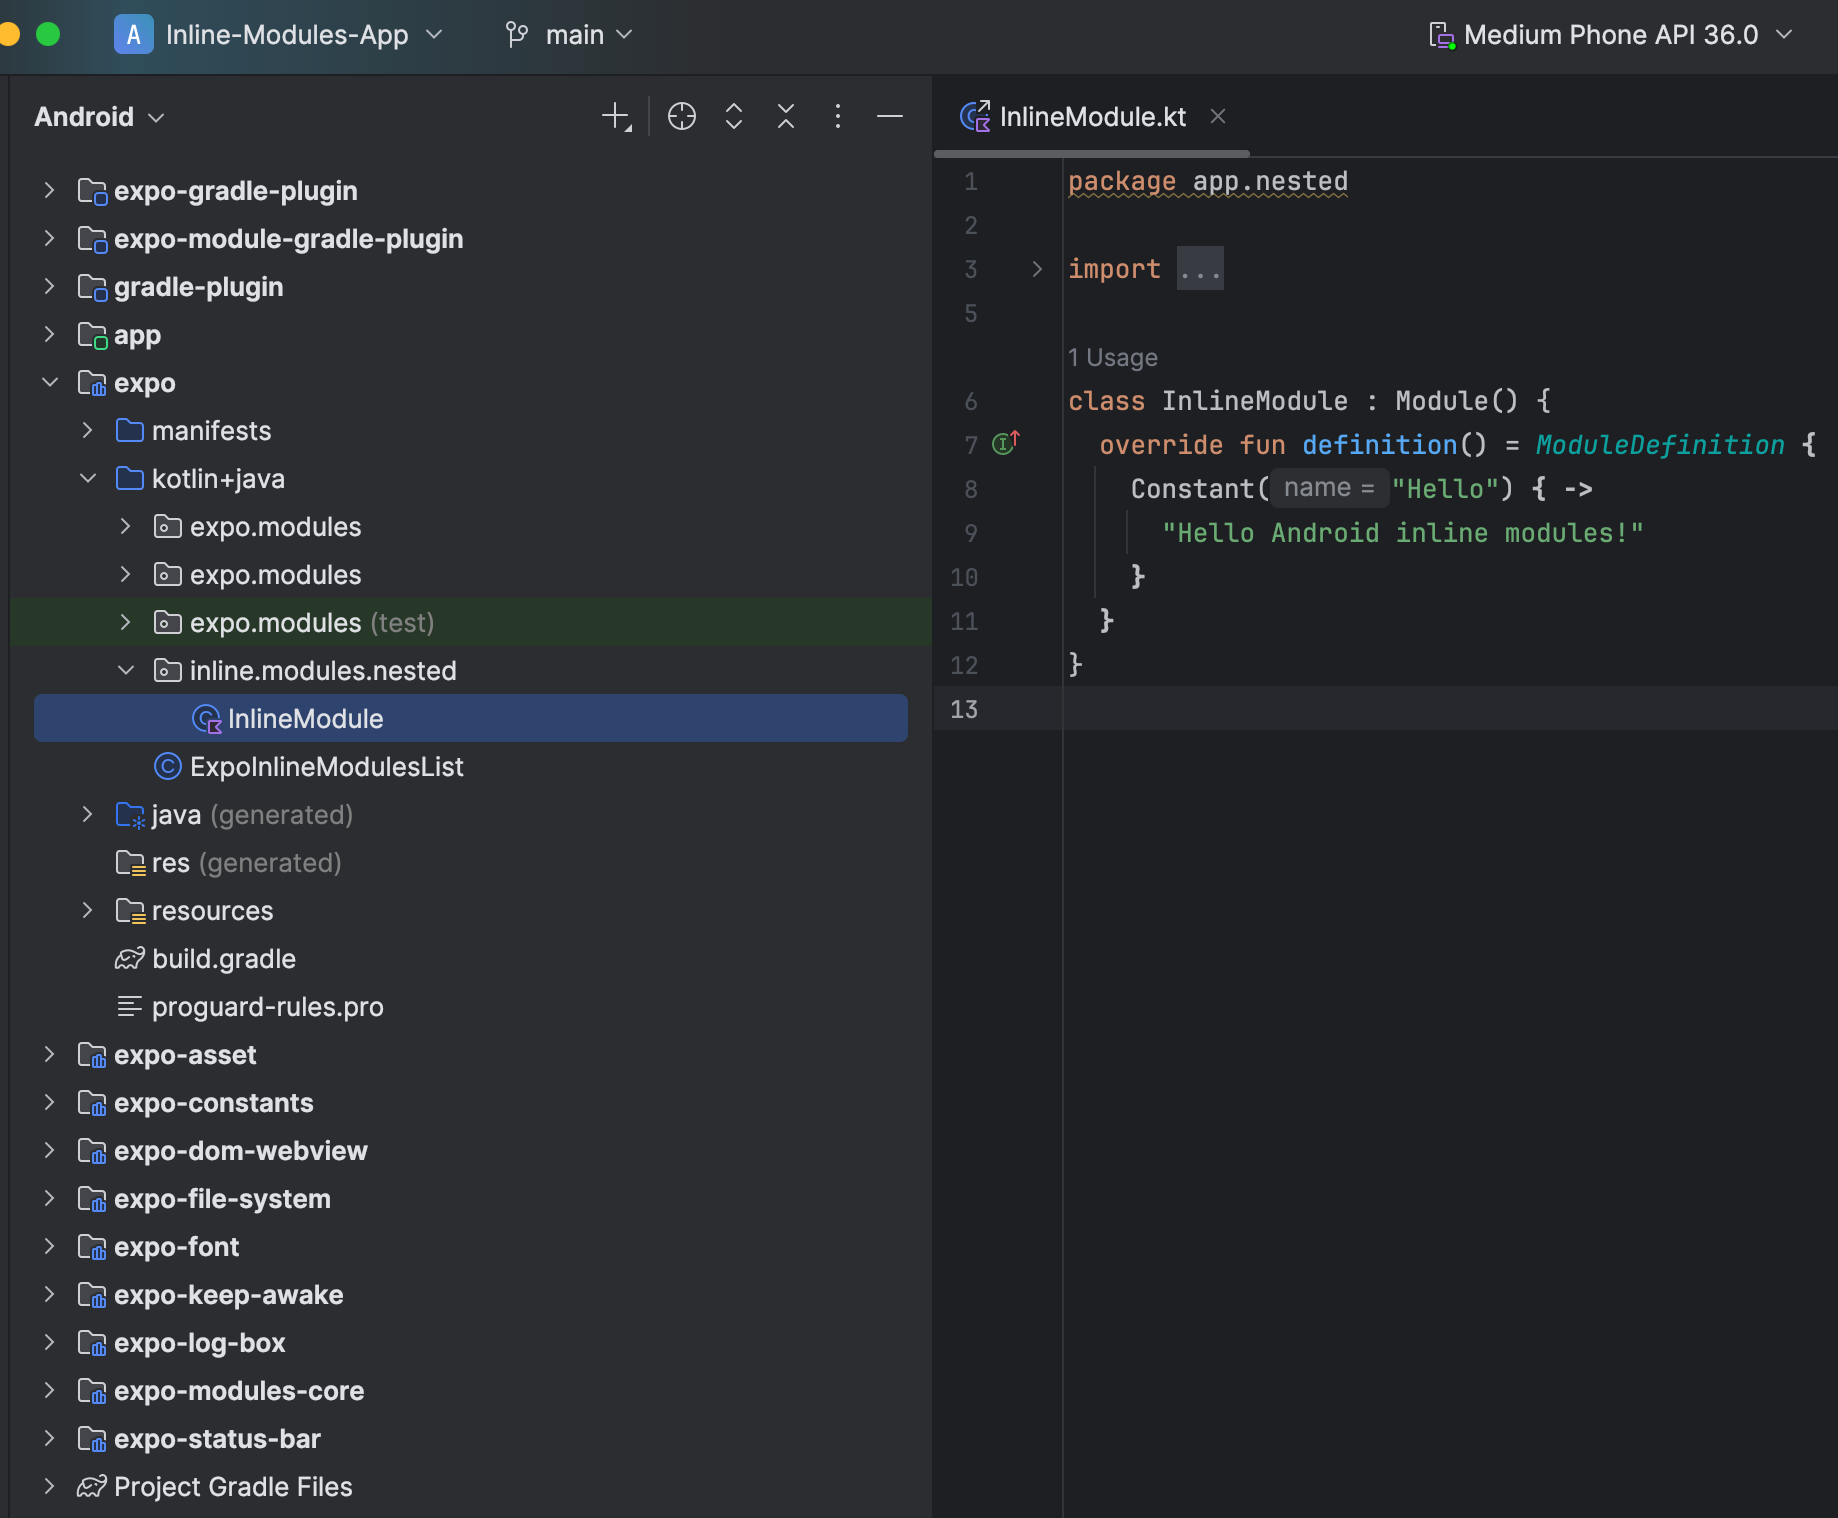
创建这样一个镜像结构可以确保:
-
原生文件会被编译:所有内联模块在 Android Studio 中可见,运行 Android 构建时会被编译。
-
其他文件会被忽略:项目中其他文件都不可见。JavaScript 和 TypeScript 文件不会被 Android Studio 索引,因为它们不在这个镜像目录中。
自动链接
所有 Expo 模块都挂在一个全局对象上,并通过原生 module provider 暴露出来。在 iOS 和 Android 的构建过程中,都会生成一个 module provider 类,其中包含对所有常规 Expo 模块以及你的内联模块的引用。在 JavaScript 中调用 requireNativeModule('InlineModule') 时,它只是对访问这个全局对象的过程做了一层封装。
类型生成
类型生成的核心思路很简单:原生模块的声明本身已经高度结构化,因此可以直接从原生代码生成它的 TypeScript 接口。expo-type-information 包做的就是这件事,它由四个主要部分组成:
-
Swift 解析器
-
模块类型的抽象层
-
TypeScript 代码生成器
-
CLI 工具
它们协同工作,自动为你的模块生成 TypeScript 接口。
类型系统
在 DSL 中定义模块时,你需要提供该模块的原生接口,包括函数、常量、类、视图等——它们在 Swift 类型系统中都有严格的类型。
但从 TypeScript 侧调用模块时,我们面对的是 TypeScript 类型系统下的 JavaScript 对象。这与 Swift 或 Kotlin 有本质区别,两者之间并不存在严格的一一对应关系。因此,数据从 JavaScript 传到 Swift 时发生的转换并不总是那么直观。
Expo 为许多类型提供了转换器,但不同的 TypeScript 结构有时会转换成完全相同的 Swift 类型。
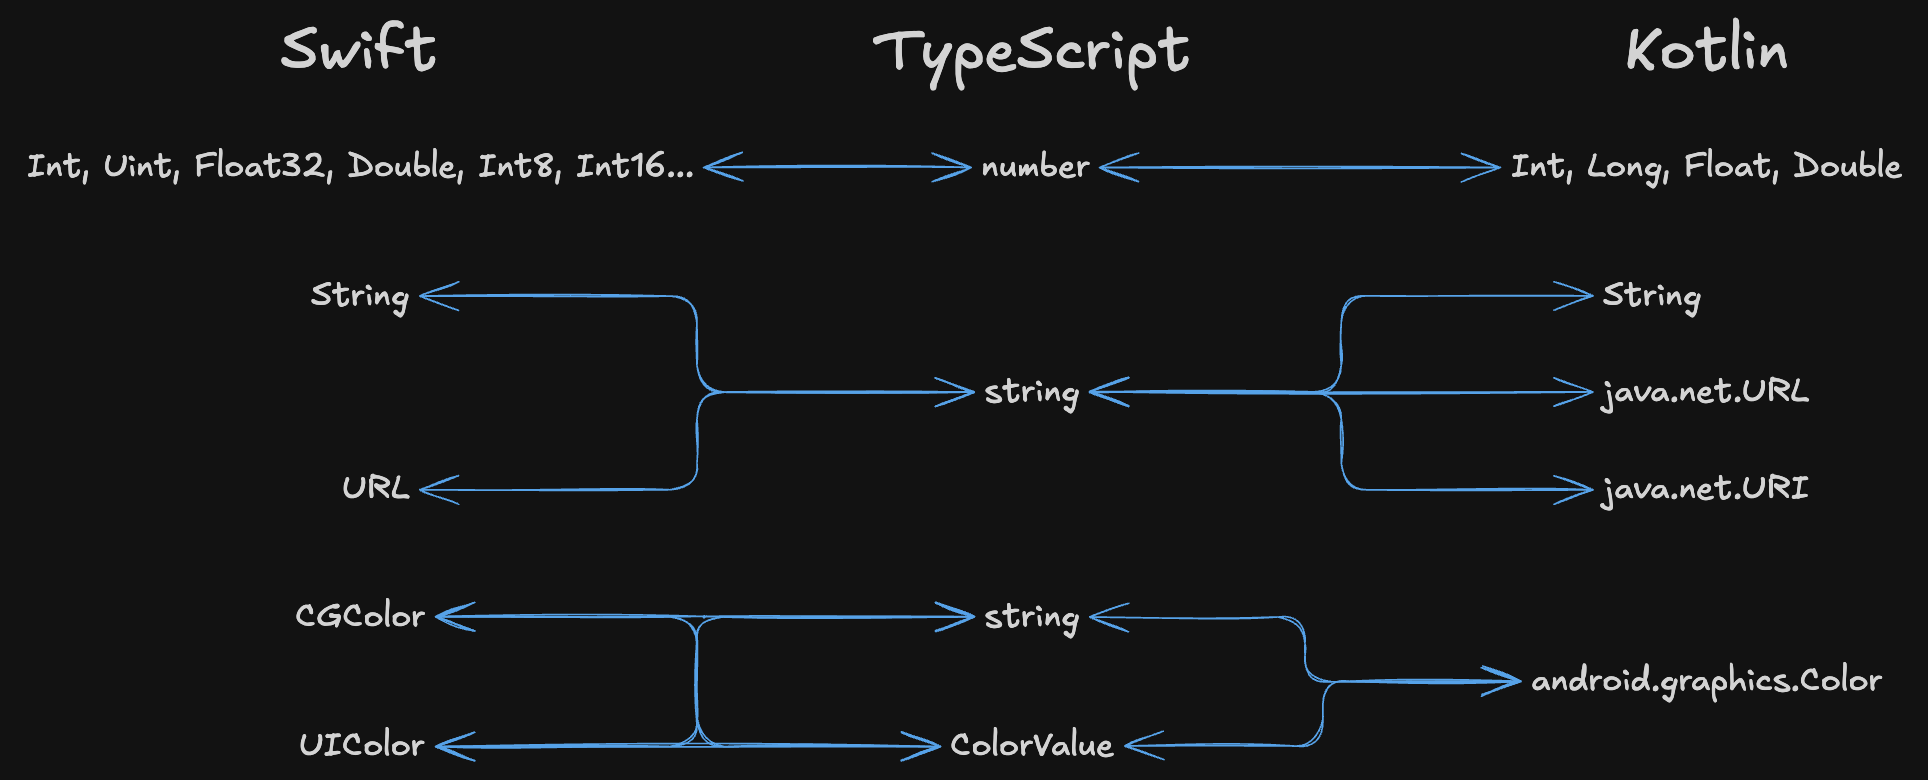
例如,在处理 Swift 的 UIColor 时,Expo 可以转换多种不同的 JavaScript 对象:颜色字符串('red')、十六进制字符串(#00ffaa00)或十六进制数字(0xff66dd00)。这些在 TypeScript 中都可以有不同的类型标注——string、number 和 ColorValue(来自 react-native)都是有效的 TS 类型,且都会转换为 UIColor。
目前我们只支持映射最基本的类型(number、string、boolean 等)。完整列表可以在参考文档中查看。我们会根据 expo-modules-core 中已有的转换器,持续为这个包添加更多类型映射。
这个库是如何工作的
接下来我们仔细看看构成 expo-type-information 包的各个组件。
解析 Swift 文件
我们使用 SourceKitten 来解析 Swift 文件。SourceKitten 会给出整个代码的结构化信息,让我们能够解析 Swift DSL、枚举和结构体。
以 InlineModule.swift 中的 Hello 常量声明为例。
Constant("Hello") {
  return "Hello iOS inline modules!"
}
这个 Swift 声明对应的 SourceKitten 输出如下:
{
  "key.bodylength": 56,
  "key.bodyoffset": 124,
  "key.kind": "source.lang.swift.expr.call",
  "key.length": 66,
  "key.name": "Constant",
  "key.namelength": 8,
  "key.nameoffset": 115,
  "key.offset": 115,
  "key.substructure": [
    {
      "key.bodylength": 7,
      "key.bodyoffset": 124,
      "key.kind": "source.lang.swift.expr.argument",
      "key.length": 7,
      "key.offset": 124
    },
    {
      "key.bodylength": 48,
      "key.bodyoffset": 133,
      "key.kind": "source.lang.swift.expr.argument",
      "key.length": 48,
      "key.offset": 133,
      "key.substructure": [
        {
          "key.bodylength": 46,
          "key.bodyoffset": 134,
          "key.kind": "source.lang.swift.expr.closure",
          "key.length": 48,
          "key.offset": 133,
          "key.substructure": [
            {
              "key.bodylength": 46,
              "key.bodyoffset": 134,
              "key.kind": "source.lang.swift.stmt.brace",
              "key.length": 48,
              "key.offset": 133
            }
          ]
        }
      ]
    }
  ]
}
SourceKitten 的一大优势在于它允许我们只解析单个文件。这是一把双刃剑:一方面,它省去了编译整个 Xcode 项目的时间,在需要不断重新生成 TypeScript 接口的工作流中是必不可少的;另一方面,无法访问整个项目意味着解析器无法解析定义在其他文件中的类型和函数。
类型信息抽象
接下来是 Expo 模块相关类型信息的抽象层。这一抽象与底层原生语言无关,也就是说我们未来可以加入对 Kotlin 的支持!它接近 TypeScript 的类型系统,因为后续会用它来生成 TS 声明。我们基于 SourceKitten 的解析器输出的正是这一抽象。
/**
 * `FileTypeInformation` object abstracts over type related information in a file.
 * The abstraction is closely related to Typescript and expo NativeModules (both to be independent of the actual native side
 * and to give accurate information about what and how we can use the given module).
 * @header TypeInfoTypes
 */
export type FileTypeInformation = {
  /**
   * @field Set of all type identifiers declared and used in the file.
   */
  usedTypeIdentifiers: Set<string>;
  /**
   * @field Set of all type identifiers declared in the file.
   */
  declaredTypeIdentifiers: Set<string>;
  /**
   * @field For parametrized types it is the maximum number of parameters this type is used with.
   * This map is useful if we want to infer how many parameters a type declared in other file has.
   *
   * For example if `Set<string>` exists in a file then inferredTypeParametersCount['Set'] == 1.
   * If `Map<number, string>` exists then inferredTypeParametersCount['Map'] == 2.
   * If you use both `SomeParametrizedType<Type1, Type2>` and `SomeParametrizedType<Type3>` then inferredTypeParametersCount['SomeParametrizedType'] == 2.
   */
  inferredTypeParametersCount: Map<string, number>;
  /**
   * @field Maps string identifier to the appropriate declaration object. For now only enum and records identifiers are mapped.
   */
  typeIdentifierDefinitionMap: TypeIdentifierDefinitionMap;
  /**
   * @field Array of all module classes declared in the given file.
   */
  moduleClasses: ModuleClassDeclaration[];
  /**
   * @field Array of all record classes declared in the given file.
   */
  records: RecordType[];
  /**
   * @field Array of all enums declared in the given file.
   */
  enums: EnumType[];
};
生成 TypeScript
Expo 模块的类型抽象完成后,下一步是生成 TypeScript 抽象语法树(AST)。我们使用 Compiler API 来构建它,并配合一组自定义封装来处理需要生成的各种声明——导入、枚举、类、函数、类型、接口等等。AST 构建完成后,我们用 Prettier 对生成的 TypeScript 进行格式化。
CLI
以上所有功能都封装在一个 CLI 工具里。它提供了一批易用的命令,用来操作普通模块和内联模块,以及调试前面几步中的那些函数。
了解更多
可以看看内联模块和类型生成的教程,以及内联模块和 expo-type-information 包的参考文档。
这两个功能目前都还是实验性的,我们还在持续开发,非常需要你的反馈。欢迎在 GitHub 上提 issue 或 pull request,也可以发条推文聊聊你的想法。